Wednesday, 3 December 2008

How to create and use web services in NetBeans

I think web services are one of the coolest  things in programming. I will now show you how to create and use a web service in NetBeans.

Let’s create a new web application  project.


Call it “WebServices”. Press Finish.
After a new project is created and opened, right click on the project, and choose “New -> Web Service”


Let’s say we want to create a web service that provides us a full name of the country whose national domain we send to the web service.
For example, if we send “it”, the web service return us “Italy, Europe”.
So, let’s give this web service a “CountryDomain” name, inside “countries.tools” package.


When we press “finish”, a new Tab will open offering us to create a web service by typing a code , or to create it with a provided visual designer.


We will use a designer.

Click on the “Add operation” button.
A new window will open, asking us how we want to call this new operation, and to define a return type and parameters.
In our example,  the return type is java.lang.String
and the parameter is a String: domain


Press ok.
Now if we look at the visual designer, we will se that there is an operation that we created, and if we look at the code, we’ll see that the NetBeans generated a definition of our new operation.
Now, we have to write it’s implementation.

I won’t complicate things up now and use some database, from which I would collect information about country whose domain I receive, so I’ll just use some HashMap with some countries listed in it …

So, let’s write some code in our web service. In the constructor I will initialize our HashMap with some countries, and in our getCountry operation, I will provide a code that will return a country name.


And now, only thing left for us to do now, is to deploy this web service. I will deploy it on glassfish server that comes with netbeans.
To deploy it, right click on the project node, and select  “undeploy and deploy”.


After it’s deployed, it’s time to test it.
Right click on the web service that you made , and  select  “test web service”.


A browser will open, and it will look something like this:
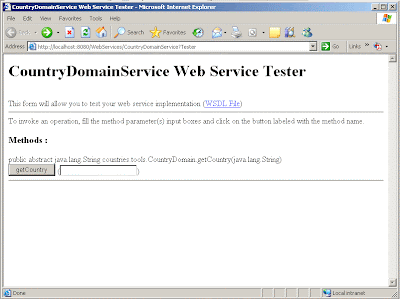


If we enter “it” ( as Italy ) , for example, and hit “getCountry” button, we’ll get a result “Italy, Europe”, or if we enter some not-existing domain ( not existing in our HashMap ) we’ll get a "Not a valid national domain" result.


Nice, isn’t it? ?


Now,  how can someone use it in it’s code?

The following example shows us how to do it.

Let’s , once again, create a new Web Application project. let’s call it  “CountryChecker”. Press Finish.

A new project will open.
Now, in order to use some web service, we need to know it’s URL. I’ll use CountryDomain ‘s URL  http://localhost:8080/WebServices/CountryDomainService?wsdl

In order to use some web service in your code, we need to create a new web service client


It will take some time for NetBeans to create it. When it does, you’ll get something like this:


And now we come to the best part:

If you want to use this web service in some of your web pages, just drag and drop it’s method onto your page, and NetBeans will generate the entire call.


and when we open this web page, we will get:


Monday, 24 November 2008

How to install glassfish Java application server

I installed Glassfish application server few days ago, for the first time.
Although it has no GUI installer and you have to do it all by typing in console window, it’s a quite easy thing to do…

I needed new Java app server for some job to be done, and it was all up to me to decide which one to use…

At the end, I decided to use either Glassfish or JBoss.

Since I worked with glassfish that comes with NetBeans, and was very pleased with it , it was probably quite easy to guess that my choice is going to be glassfish…
After all, glassfish is nothing else then Sun Java System Application Server , but without GUI installer and some extra options in it and, of course, without support…

So, glassfish it is!

There’s a lot of documentation on how to install and start it, and you can easily find out everything you need to do that…

Since all the information that you need to know when installing this application server are on several locations on the internet, I will try to explain the entire process on how to install glassfish on windows so you don’t have to look for it on the net, hoping to save you some time…


- Prerequisites

In order to install glassfish, we need to have JDK 1.5 , or some newer version installed on the computer on which the glassfish will be running.
Be aware: not just JRE , but JDK + JRE!

So, install it and set all system variables ( JAVA_HOME, PATH and CLASSPATH ).

- Installation

Let’s start with downloading binaries.
Go to the https://glassfish.dev.java.net/public/downloadsindex.html and download the latest stable version.

The installation file is java archive. I downloaded
glassfish-installer-v2ur2-b04-windows.jar

Let’s take this file, and place it where you want to install it.

Tip: Wherever you place it, when you start the installation, the installer itself will create a “glassfish” folder on that location and place all the files in it…

I don’t know why, but I like to install servers and all similar applications in root of C disk and not in “Program files”, so I’ll create a folder called “Sun” on the C disk , and copy glassfish-installer-v2ur2-b04-windows.jar in it , because I want my server to have a “C:\Sun\glassfish” path.

We will start installation by typing

java –Xmx256m –jar glassfish-installer-v2ur2-b04-windows.jar

It will first ask you to read ( scroll all the way down ) some licence agreement , or something like that. After you accept it, the installer will copy all the files to the “.\glassfish” folder.
The installation is almost finished. There are just few more things that needs to be done.
First of all, go to the <GLASSFISH_HOME>\lib\ant\bin\ and type

ant –f setup.xml

or from within installation directory type

.\lib\ant\bin\ant –f setup.xml

This way, we created a new domain: domain1.
Before you do this, you can open it with some editor and change the default names and ports, but if there’s no special need to do it – just don’t . Install it with default settings.

Now add the <GLASSFISH_HOME>\bin folder to the environment variable “PATH” ( then restart console window) , and at this moment your glassfish is installed and you can start it by typing

asadmin start-domain domain1

and stop it by typing

asadmin stop-domain domain1

BUT:

We now have two problems:

- Glassfish does not have any tool to help you create a windows service for it , and since it is an application server , we need to have it running as a windows service. Fortunately, glassfish has executable called appservService.exe which communicates with the windows service controller, and we’ll use it later…

- Glassfish was developed using Java and therefore it uses JVM. But, when a user logs off - JVM turns off as well, and this is something we do not want to happen with our application server when the user that started it logs of…We need to control this.


So, the solution for the first problem is provided to us by Ryan de Laplante , who made a GlassfishSvc.jar file that will help us create a windows service for glassfish server.
Go to http://www.ryandelaplante.com/rdelaplante/entry/creating_a_windows_service_for
and download this file.
After you downloaded it, copy it to your installation folder ( in my case: “C:\Sun\glassfish\” ) and run it with

java –jar GlassfishSvc.jar –i

First problem solved ;-)

We will solve the second problem with –Xrs JVM option.

Open <GLASSFISH_HOME>\domains\domain1\config\domain.xml file and add the following line:

<jvm-options>-Xrs</jvm-options>

to the part of the file that has many other <jvm-options>something…</jvm-options> tags…

Now, as I red, many people reported that this doesn’t work on windows 2003 server, so if this didn.t help, go to <GLASSFISH_HOME>\lib\processLauncher.xml
and add a line

<sysproperty key=”-Xrs”/>

inside a

<process name=”as9-server”>

section.

What I did first, I added a line to <GLASSFISH_HOME>\domains\domain1\config\domain.xml , restarted a server and logged off, but the JVM turned off also. This didn’t work for me…

Then, I tried second option, restarted a server, logged off - but it didn’t work as well…???

Then, I restarted windows, (server started by itself because it’s now a windows service), logged of and everything worked well…
If someone asks me which solution helped me – I would tell him “I really don’t know, and I don’t care…”


So, that’s it!
Now you have a glassfish application server installed, you have a windows process for it and your JVM won’t turn off causing the server to shut down as well when you log off, and that is all we needed…

I hope this text will help someone…

Good luck and enjoy your glassfish!

Thursday, 20 November 2008

Read and write to .properties and .ini files

It is usual to store settings or properties of an application in some of these 5 known ways:

- to DB
- to XML
- to .ini file
- to .properties file
- to registry

My favorite are XML and .ini/.properties file.
All of them has some kind of restrictions, and it’s really up to data type that application needs to save , and which programming language I’m using at that moment…

If my application needs to read/save small number of information, without complex scheme of sections, then I always use .properties or .ini files.

To be honest, first time I used ( Java )class that works with .properties files, I was very surprised how easy is it to read/write settings. And all of that with small-size code, which is not usual in Java. ( Look at my earlier blog about parsing a document in PHP and Java : http://devtalks.blogspot.com/2008/09/parsing-xml-php-vs-java_16.html )

In Java, in order to work with .properties files, there’s a Properties class. Properties class extends HashTable , so we manipulate properties through the get and set methods.
It’s quite easy and fun to work with it.
Let’s say we have some file: example.properties, and it looks something like this:

We could easily parse it like this:
or, write current properties in application into the file with:

If we write

public static void main(String args[])
{
Main main = new Main();
main.readProperties();
}


the result would be:

color= blue
width= 150
height= 100
color= blue width= 150 height= 100
The other way around, if we write

public static void main(String args[])
{
Main main = new Main();
main.saveProperties();
}

the example.properties file would look like this:
but, as you can see, without any particular order among properties that we wrote.

As I sad, I didn’t used to write something in Java with such small code size, and it feels great… :-)

All of this reminds me of TIniFile class in Borland Builder, and it is very hard to catch up with BCB when it comes to simplicity ( in my opinion, that is…).

Let’s take a look how we would do this in BCB. Ini files are very similar to .properties files. The difference is that .ini files have sections, and .properties doesn’t.


Let’s make a test application:
and let’s say we have file example.ini with a "data" section, and is looks something like this:
and we need to write these settings in appropriate Edits on the Form when someone starts the application. At exit, we need to overwrite properties in a file with those that are in these three Edits at that moment…

First of all, we would need this line:

Then, we could easily parse the document with:

or, write current properties in application into the file with:


If we write a constructor and a FormClose event like this:
__fastcall TForm1::TForm1(TComponent* Owner)
: TForm(Owner)
{
Form1->ReadProperties();
}
//---------------------------------------------------------

void __fastcall TForm1::FormClose(TObject *Sender, TCloseAction &Action)
{
Form1->SaveProperties();
}

and we start the app, it will read properties from ini file, and show it.


and , if we write some other values, then the FormClose event will write new values to the ini file, preserving the order that we wanted...


So, you saw now how easy it is to save properties into these two formats. I hope you like it the way I do...


Tuesday, 18 November 2008

Writing OS-independent JAVA code

One of the best things about Java is the fact that it’s applications are OS independent.
This means that you can write application on one OS, and run it on some completely different.

We ought to thank to JVM for this. It is JVM that cares how things should be done on certain OS.

When you say, for example:

new Thread(new Runnable(){public void run(){System.out.println("Hi, I'm thread!");}}).start();

Different OS will create this new Thread , set it’s priority , execute it and do many other things on completely different way, but thanks to JVM Java developers do not have to care about these things...

Another good example is file chooser. For example, windows and Solaris have different file chooser , and if you use it’s APIs to call it your code would look completely different, but in Java you don’t care about it. Code:

JFileChooser jfilechooser = new JFileChooser();
if (jfilechooser.showOpenDialog(frame) == JFileChooser.APPROVE_OPTION)
...

will work on windows, and on Linux, and on about any other OS that you can find JVM for it...

But, there is always a "BUT..."!

Yes, with Java and it’s JVM over 90% of your apps will work on any OS that has JVM for it, but there are some rules that you must stick to when developing app that will run on different OSs.

These are mostly trivial things, but enough to make your app not working correctly on a different OS.

These are some of the most common:

-Using "/" or "\" instead of System.getProperty("file.separator"). Different operating systems has different file separators. So, if you don’t know on which OS your app will run on, it is wise that instead of using, for example,

String some_path = ".\\some_file.txt";

you use

String some_path = "." + System.getProperty("file.separator") + "some_file.txt";


-Using absolute, instead of relative path. It is wise to use relative instead of absolute path because different OS have different file paths! For example, "c:\\some_file.txt" doesn’t mean anything on some linux, but "." + System.getProperty("file.separator") + "some_file.txt" , for example, certainly does!


-Using sockets on port < 1023. Be aware that on some operating system ( for example linux ) only special users ( root) can use ports smaller than 1023. It is very wise to use port > 1023 if you can...


-It is wise to use System.getProperty("line.separator") instead of "\n" at the end of the line when writing something to files.


-Using OS-specific command when executing OS commands.
Process process = Runtime.getRuntime().exec(command); can be very convenient , but be aware that different operating systems have different commands!


-Mixing letter case when working with files and folders. This is very common problem. Many developers that use windows just forget that other OS are case-sensitive. So, in linux , if you try to read from file
"." + System.getProperty("file.separator") + "some_file.txt"
and that file is realy a "Some_file.txt" or , for example, "Some_file.TXT" you wan’t be able to read it, and your app will not work correctly...

And the last ( and probably the least ):
-You probably will never create so many threads so that your OS will not be able to process them all, but if you are using some older OS, or create very very large number of threads, different OS will act differently because not all OS have the same limitation for maximum number of active threads at the same time ( native threads, not green threads )


These are just some of the rules you should stick to, if you want your app to really work the same way on different operating systems. No matter how trivial they are, people often forget about it...

Wednesday, 12 November 2008

God bless debugger

Have you ever wrote a code , and when you looked at it you just felt proud you wrote it.

And then you decide to try it, and at some moment you find out that it has some kind of a bug?!
Fortunately, you are able to fix a code in a short time, like you always do…
Then you take a good look at the code and at some point you say to yourself “No, there’s no way there’s something wrong with it!”
Then you keep on trying , and you test it more and more, you write it again and the damn bug just keep on playing with your brain… “What wrong? Where did I made a mistake?”

So, have you? Yes? No?

Well, I have!

Not very often, but once or twice in a while...

Oh, and yes , I forgot to mention: the worst thing is not the fact that you have a bug in your code!
Noooo: the worst thing is that your application is a network-based and you have several instances of it communicating in VPN so you don’t know is it something a bad network does to it, some kind of a collision, unplugged cable, a firewall, bad code, some bad admin’s setup, is there some older version communicating with the new ones or just some of 1000000 other possible reasons… yes, that’s the worst thing about it!

Fortunately, there’s something called debugger!
If you develop software for living , you will soon find out that a good debugger is your best friend!

There isn’t a problem you can’t solve in a few minutes!

Unfortunately it seems that many developers have forgotten this.

It's really fascinating that debugger isn't used as often as it should...
I think this is one of those must-know-how-to-use things, and every developer should now how to use it, but at the moment I don’t know many people who does.

Even if they know how to use it, they never do…

I use NetBeans IDE . It has a great debugger!

I always use it when there's a need.
I find my self able to spot and fix a bug in a very short time, no matter how big, small, stupid or hidden it is, but few days ago… Man, I wanted to buy my debugger a beer!
That is when I decided to write about it on my blog.

There’s no way I could solve those problems that fast without it!
I would be stuck for hours trying to find a problem…

Now, it all works just fine… ;-)

How often do you use debugger?

Tuesday, 14 October 2008

A joy of working with subversion (in NetBeans)

I didn’t know that subversion is such cool thing until I tried it…

Today, I can’t imagine a project developed without it !

I started using SVN just recently, when it became too hard for a team , that I was a member of , to synchronize itself while working on a project. Everyone had it’s version of source code  and merging all the changes was a nightmare!
That is when Me and  my team college  thought “Why wouldn’t we give subversion a try?“ After all , NetBeans ( that we use ) has integrated subversion support…

So, all we had to do was to install subversion , create a repository and start using it.
Well, not just that: we needed subversion joined with some web server because we wanted to install it on some server so everyone in the team could access it over network.

If you are in the same position and use MS Windows, I advise you to try VisualSVN server (  http://www.visualsvn.com/server/ ) .

“VisualSVN Server is a package that contains everything you need to install, configure and manage Subversion server for your team on Windows platform. It includes Subversion, Apache and a management console.”


It’s much easier than to set the apache yourself!
All you need to do is to install it ( just few easy steps ) and you’ll have preconfigured apache with subversion installed!
And not just that: you’ll even have a GUI manager to manage repositories , users and groups for it!
Cool thing!

As for now, I am very satisfied with it…

It is no longer a problem for several programmers to work on the same project at the same time,  and everyone always have  the latest version of project source code.
Even the fact that the team members are on different locations is no longer a problem…

One advice: before you start using subversion with your copy of  NetBeans, I advise you to use projects groups within NetBeans when creating/sorting  your projects.
It can significantly make things easier for you!
For example: If you are working on some large project “PR1” , I advise you to create a new folder inside “C:\Documents and Settings\...\My Documents\NetBeansProjects”  called, for example, “PR1” and to place all the projects that belong to “PR1”  inside that folder. That way, when you import some of these child projects  to SVN repository, all the other projects that are  in root of “PR1” folder will inherit the same repository path ( URL ) …
This is the way it works.
If you place all of your projects in root of “C:\Documents and Settings\...\My Documents\NetBeansProjects”, then all of them will inherit the same repository path ( URL ) and when you try to import some project into new repository - you’ll find yourself with a problem, and thing are going to become a little more complicated…

So, let’s make a few steps on how to install and use subversion in NetBeans.

First of all, go to the http://www.collab.net/downloads/netbeans/ , and download and install CollabNet subversion client. It is required that you have it installed on your computer.

Install VisualSVN .

When you install VisualSVN, start VisualSVN server manager, and create a repository, for example “PR1”.


Create new user for repository (Right click on:”users” and then click “create new user”).

You can also set who can gain access to some repository. Everyone can access every repository by default. To change that, right click on the repository -> properties-> security.

Let’s create a folder in the  “C:\Documents and Settings\...\My Documents\NetBeansProjects” with a same name as our repository.
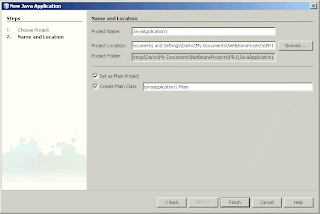
Now, let’s start NetBeans and create a project group out of “C:\Documents and Settings\...\My Documents\NetBeansProjects\PR1” folder.


and create a project called JavaApplication1 in it…


Now, we have out project created, and we can now import it to the SVN repository.
Right click on the project -> Versioning -> Import into subversion repository


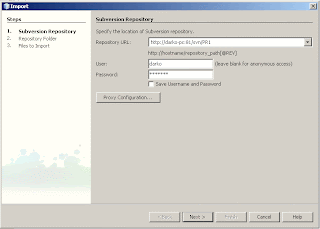
A window like this one will open:


Let’s enter our repository URL. You can see your repository URL in the VisualSVN server manager , when you click on it:


Let’s enter it .


Enter your user name and password and press next.
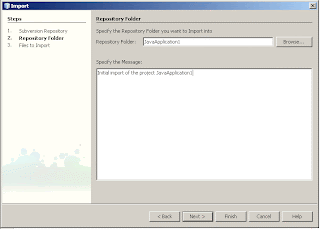
Give your repository folder a name. I’ll leave it the same as project folder, and enter a custom message:


When you press next you’ll get the last window, which lists all the files that you are about to import:


Click finish.

Voila! Now you have your project versioned!

Notice that now, when you do a right click on the project , you’ll have item “subversion” that contains actions as “diff” , “update” , “commit” and others…

Your team can now do a  “checkout…” in order to create a copy of a project on their local PC, do a “commit” when they change some part of code, do an “update” when they want to update a local project with all the changes that were made by other members of a team and so on…

Enjoy working on a project using subversion! 


Friday, 3 October 2008

Google Chart API

Have you ever tried using Google Chart API ?

http://code.google.com/apis/chart/

It’s great! It helps you generate charts for your web site, report…

All you need to do is to create an URL containing all the parameters needed to create your chart, and google will create .png image containing your chart.

For example,

this chart was generated using Google Chart API:


and it shows what countries does devtalks visitors come from ( until 03. aug. 2008 ).
URL for this chart is:


You can even include a Chart API image in an HTML document by embedding a URL within an < img > tag!


I thing Google is amazing. Those guys just keep on impressing me…


Saturday, 20 September 2008

C++ in plain english ( book recommendation )

Are you a C / C++ developer?

I was looking for something in my books today and decided to write this post for those who use C / C++ .
It’s about one particular book I own, probably my favorite...

Have you ever heard of a book “C++ in plain English”? Yes? No?
Well, if you ARE a C / C++ developer, than you definitely should get one!
I have one for several years, and I’m completely satisfied with it!


This is not a book that will help you learn C / C++ from the beginning.
It has a purpose like a dictionary: to help you find what some function, operator or class does and how to use it…

In the first part of the book you’ll find a complete overview of C++.
Complete syntax , operators , functions and classes of ANSI C++ are listed and explained in it.

The book itself helps you find what you need in two ways:

- By asking you what do you want to do , and than telling you which function , operator or class to use…
- By listing all functions , operators and classes with explanation what it does and when to use it…

The second part of the book is C++ in practice. Here you’ll find texts about OOP and all of it’s principles , and about many other things you use in C++ programming.

Great thing about all this is that entire book is indeed one big C++’s dictionary and a reminder , and because of that ( in my opinion ) professionals who work with C/C++ will be more satisfied with it than the beginners looking for a way to learn C/C++ .

I used it while working on several projects already, and every time I found an answer and a solution to a problem…

Tuesday, 16 September 2008

Parsing XML: PHP vs Java

Let's see how much time does PHP programmer spend to parse some XML file.
Here is our test XML file:


and this is how I would parse this document in PHP:


and the result would be:
 
Nice, don't you think?
And this is how I would parse the same file in Java:


Main.java:

package me.tcom.kdarko.blog;

import java.io.IOException;
import java.util.ArrayList;
import org.xml.sax.SAXException;

public class Main
{
   
    private ArrayList arraylist = null ;
   
    public static void main(String[] args)
    {
    try {
        Main m = new Main();
        m.arraylist = new EmployeesListParser("list_of_employees.xml").doParse();
        for(Employee e:m.arraylist)
        System.out.println("Employee: ID: " + e.getId() + " , " + e.getName() + "  " + e.getLast_name());       
        }
        catch (IOException ex)
        {
        System.out.println(ex.getMessage());
        }
        catch (SAXException ex)
        {
        System.out.println(ex.getMessage());
        }
        catch (Exception ex)
        {
        System.out.println(ex.getMessage());
        } 
    }

}
Employee.java:

package me.tcom.kdarko.blog;

public class Employee
{

    String id , name, last_name;

    public Employee() {
    }
  
    public Employee(String id, String name, String last_name) {
        this.id = id;
        this.name = name;
        this.last_name = last_name;
    }

    public String getId() {
        return id;
    }

    public void setId(String id) {
        this.id = id;
    }

    public String getLast_name() {
        return last_name;
    }

    public void setLast_name(String last_name) {
        this.last_name = last_name;
    }

    public String getName() {
        return name;
    }

    public void setName(String name) {
        this.name = name;
    }
       
}
EmployeesListParser.java:

package me.tcom.kdarko.blog;

import java.io.IOException;
import java.util.ArrayList;
import org.xml.sax.Attributes;
import org.xml.sax.ContentHandler;
import org.xml.sax.Locator;
import org.xml.sax.SAXException;
import org.xml.sax.XMLReader;
import com.sun.org.apache.xerces.internal.parsers.SAXParser;

public class EmployeesListParser implements ContentHandler
{
    private String XML_FILE_NAME;
    String temp = null;
    Employee employee = new Employee();
    StringBuffer sb=new StringBuffer();
    private ArrayList arraylist = new ArrayList();

    public EmployeesListParser(String XML_FILE_NAME) {
        this.XML_FILE_NAME = XML_FILE_NAME;
    }
   
    public ArrayList doParse() throws IOException, SAXException
    {
     XMLReader parser = new SAXParser();
     parser.setContentHandler(this);
     parser.parse(XML_FILE_NAME);
     return arraylist;  
    }

    public void startElement(String uri, String name, String qName, Attributes atts) throws SAXException
    {
         sb.setLength(0);
         if(name.equalsIgnoreCase("id"))
             temp="id";
         else if(name.equalsIgnoreCase("name"))
             temp="name";
         else if(name.equalsIgnoreCase("last_name"))
             temp = "last_name";
         else if(name.equalsIgnoreCase("employee"))
          employee = new Employee();
    }

    public void endElement(String uri, String name, String qName) throws SAXException
    {
    sb.setLength(0);
    if(name.equalsIgnoreCase("employee"))
    {
     arraylist.add(employee);
     employee=null;
    }
    }

    public void characters(char[] arg0, int arg1, int arg2) throws SAXException
    {
        sb.append(arg0,arg1,arg2);
        String s = sb.toString().trim();
        if(!s.equals(""))
        {
        if( temp.equalsIgnoreCase("id") )
        {
         employee.setId( s );
        }
        else if( temp.equalsIgnoreCase("name") )
        {
        employee.setName( s );
         }
         else if( temp.equalsIgnoreCase("last_name") )
         {
        employee.setLast_name(s);
         }
    }
    }

    public void setDocumentLocator(Locator locator) {
    }

    public void startDocument() throws SAXException {
    }

    public void endDocument() throws SAXException {
    }

    public void startPrefixMapping(String prefix, String uri) throws SAXException {
    }

    public void endPrefixMapping(String prefix) throws SAXException {
    }

    public void ignorableWhitespace(char[] ch, int start, int length) throws SAXException {
    }

    public void processingInstruction(String target, String data) throws SAXException {
    }

    public void skippedEntity(String name) throws SAXException {
    }
   
}
 
and the result would be:


:-)
No comment...

Friday, 12 September 2008

Data block wizard problem: cannot select all available columns

I had a problem few days ago with oracle forms builder,  and unfortunately could not find answer on the net why is it happening…
I created a view and needed to make a data block on my canvas, but data block wizard refused to let me choose all available columns in that view:

Let’s start from the beginning.
Let’s say we have a table called test:

Let’s make some (stupid) view of it. Let’s say we need a view that looks like this:
Select id, first , second, first || second as "FIRST AND SECOND TOGETHER" from test

Lets call it test_view.
So, I wrote:
Create view test_view as Select id, first , second, first || second as "FIRST AND SECOND TOGETHER" from test
And I couldn’t use column "FIRST AND SECOND TOGETHER" !!!???

This was the first time this happened to me, and I was working with view in data block wizards before…
After a while I finally found out why this was happening.
It seems that oracle forms builder  won’t let you select column that was named as “” in create view statement.
It is totally legal to say:
 Create view test_view as
Select id, first , second, first || second as "FIRST AND SECOND TOGETHER" from test
And it will work just fine, but you won’t be able to use it in oracle forms builder.
So, at the end, I  was foced to name my column FIRST_AND_SECOND_TOGETHER ( one word!!!) :
CREATE OR REPLACE VIEW TEST_VIEW
AS
select id , first, second , first || second as FIRST_AND_SECOND_TOGETHER from test;
and it worked!!!
I hope this will help someone…


Friday, 29 August 2008

Ganymede around the world contest shirt received!


This summer ended great!
When I returned yesterday from Greece, where I was on summer vacation , I found a package on my desk.


I received  my Ganymede around the world contest shirt!
I thought it’s going to be the white one, but this one is much better!
It’s great!
Here are some pictures: