Today, I can’t imagine a project developed without it !
I started using SVN just recently, when it became too hard for a team , that I was a member of , to synchronize itself while working on a project. Everyone had it’s version of source code and merging all the changes was a nightmare!
That is when Me and my team college thought “Why wouldn’t we give subversion a try?“ After all , NetBeans ( that we use ) has integrated subversion support…
So, all we had to do was to install subversion , create a repository and start using it.
Well, not just that: we needed subversion joined with some web server because we wanted to install it on some server so everyone in the team could access it over network.
If you are in the same position and use MS Windows, I advise you to try VisualSVN server ( http://www.visualsvn.com/server/ ) .
“VisualSVN Server is a package that contains everything you need to install, configure and manage Subversion server for your team on Windows platform. It includes Subversion, Apache and a management console.”
It’s much easier than to set the apache yourself!
All you need to do is to install it ( just few easy steps ) and you’ll have preconfigured apache with subversion installed!
And not just that: you’ll even have a GUI manager to manage repositories , users and groups for it!
Cool thing!
As for now, I am very satisfied with it…
It is no longer a problem for several programmers to work on the same project at the same time, and everyone always have the latest version of project source code.
Even the fact that the team members are on different locations is no longer a problem…
One advice: before you start using subversion with your copy of NetBeans, I advise you to use projects groups within NetBeans when creating/sorting your projects.
It can significantly make things easier for you!
For example: If you are working on some large project “PR1” , I advise you to create a new folder inside “C:\Documents and Settings\...\My Documents\NetBeansProjects” called, for example, “PR1” and to place all the projects that belong to “PR1” inside that folder. That way, when you import some of these child projects to SVN repository, all the other projects that are in root of “PR1” folder will inherit the same repository path ( URL ) …
This is the way it works.
If you place all of your projects in root of “C:\Documents and Settings\...\My Documents\NetBeansProjects”, then all of them will inherit the same repository path ( URL ) and when you try to import some project into new repository - you’ll find yourself with a problem, and thing are going to become a little more complicated…
So, let’s make a few steps on how to install and use subversion in NetBeans.
First of all, go to the http://www.collab.net/downloads/netbeans/ , and download and install CollabNet subversion client. It is required that you have it installed on your computer.
Install VisualSVN .
When you install VisualSVN, start VisualSVN server manager, and create a repository, for example “PR1”.
Create new user for repository (Right click on:”users” and then click “create new user”).
You can also set who can gain access to some repository. Everyone can access every repository by default. To change that, right click on the repository -> properties-> security.
Let’s create a folder in the “C:\Documents and Settings\...\My Documents\NetBeansProjects” with a same name as our repository.
Now, let’s start NetBeans and create a project group out of “C:\Documents and Settings\...\My Documents\NetBeansProjects\PR1” folder.
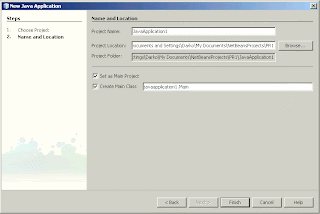
and create a project called JavaApplication1 in it…
Now, we have out project created, and we can now import it to the SVN repository.
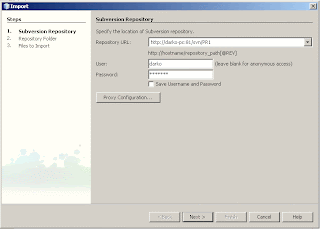
Right click on the project -> Versioning -> Import into subversion repositoryA window like this one will open:
Let’s enter our repository URL. You can see your repository URL in the VisualSVN server manager , when you click on it:
Let’s enter it .

Enter your user name and password and press next.
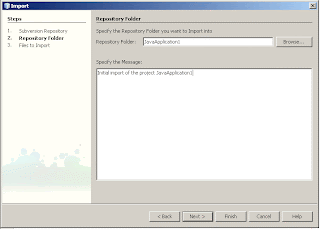
Give your repository folder a name. I’ll leave it the same as project folder, and enter a custom message:
When you press next you’ll get the last window, which lists all the files that you are about to import:
Click finish.
Voila! Now you have your project versioned!
Notice that now, when you do a right click on the project , you’ll have item “subversion” that contains actions as “diff” , “update” , “commit” and others…
Your team can now do a “checkout…” in order to create a copy of a project on their local PC, do a “commit” when they change some part of code, do an “update” when they want to update a local project with all the changes that were made by other members of a team and so on…
Enjoy working on a project using subversion!


