Let’s create a new web application project.
Call it “WebServices”. Press Finish.
After a new project is created and opened, right click on the project, and choose “New -> Web Service”Let’s say we want to create a web service that provides us a full name of the country whose national domain we send to the web service.
For example, if we send “it”, the web service return us “Italy, Europe”.So, let’s give this web service a “CountryDomain” name, inside “countries.tools” package.
When we press “finish”, a new Tab will open offering us to create a web service by typing a code , or to create it with a provided visual designer.
We will use a designer.
Click on the “Add operation” button.
A new window will open, asking us how we want to call this new operation, and to define a return type and parameters.
In our example, the return type is java.lang.String
and the parameter is a String: domain
Press ok.
Now if we look at the visual designer, we will se that there is an operation that we created, and if we look at the code, we’ll see that the NetBeans generated a definition of our new operation.Now, we have to write it’s implementation.
I won’t complicate things up now and use some database, from which I would collect information about country whose domain I receive, so I’ll just use some HashMap with some countries listed in it …
So, let’s write some code in our web service. In the constructor I will initialize our HashMap with some countries, and in our getCountry operation, I will provide a code that will return a country name.
And now, only thing left for us to do now, is to deploy this web service. I will deploy it on glassfish server that comes with netbeans.
To deploy it, right click on the project node, and select “undeploy and deploy”.After it’s deployed, it’s time to test it.
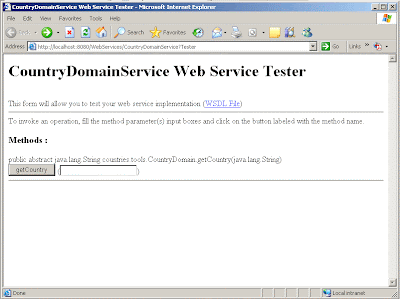
Right click on the web service that you made , and select “test web service”.A browser will open, and it will look something like this:

If we enter “it” ( as Italy ) , for example, and hit “getCountry” button, we’ll get a result “Italy, Europe”, or if we enter some not-existing domain ( not existing in our HashMap ) we’ll get a "Not a valid national domain" result.
Nice, isn’t it? ?
Now, how can someone use it in it’s code?
The following example shows us how to do it.
Let’s , once again, create a new Web Application project. let’s call it “CountryChecker”. Press Finish.
A new project will open.
Now, in order to use some web service, we need to know it’s URL. I’ll use CountryDomain ‘s URL http://localhost:8080/WebServices/CountryDomainService?wsdl
In order to use some web service in your code, we need to create a new web service client
It will take some time for NetBeans to create it. When it does, you’ll get something like this:
And now we come to the best part:
If you want to use this web service in some of your web pages, just drag and drop it’s method onto your page, and NetBeans will generate the entire call.
and when we open this web page, we will get:


